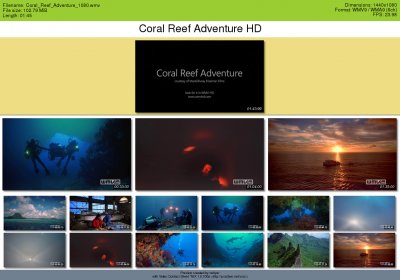
Table of Contents
Usage
vcs should be run from the command line. Through the use of command-line options or configuration files its behaviour can be configured to fit your needs.
Default behaviour
When run with no arguments, vcs will show the following traits:
- A capture is taken every 5 minutes. Videos shorter than 5 minutes will be rejected with default options
- The captures will be placed in a grid, 2-columns wide and as many rows as required
- Individual captures will have the dimensions of the input video (no thumbnails by default)
- Output will be PNG format and named like the input file (extension included) plus
.png(e.g.$ vcs “some file.avi”will producesome file.avi.png) vcswon't ever overwrite files (unless a bug slips). If the output file exists it will add a numbered suffix before the extension, so ifoutput.pngexists it will createoutput.avi-1.png(oroutput.avi-2.png,output.avi-3.pngand so on)-
Capture count modes
There's two ways to decide how many captures are made: at intervals or a fixed number. These correspond to the command-line options -i and -n respectively (long options: --interval and --numcaps)
The fixed number mode is aesthetically preferable because it can always fill the contact sheets, while the interval mode might leave some empty spaces.
Intervals can be specified in number of ways, see Time/Interval syntax for details. To take a capture every minute you could use $ vcs -i 1m file.avi. vcs will show how many captures will make in total while working, e.g.:
Generating capture #1/7 (04:16.15)...
Generating capture #2/7 (08:32.31)...
Generating capture #3/7 (12:48.46)...
Generating capture #4/7 (17:04.62)...
[...]
In this example 7 captures are to be made, 4 have been completed already.
Setting a fixed number on captures is straightforward, just follow the appropriate option with the number of captures, e.g. to make 8 captures: $ vcs -n 8 file.avi.
Note it (obviously) doesn't make sense to use both -n and -i. The last one in the command line will prevail.
Number of columns
The number of columns produced is dictated by the -c (--columns) argument. Follow it by the number of columns.
The number of rows can't be manually set, there will always be as many as needed to accommodate the number of columns and captures.
Capture size and aspect ratio
Size of the captures can be set by defining their height and/or their aspect ratio. Width is always derived, this is by design although by combining height and aspect ratio you can manually set both width and height (explained below). The size of the full contact sheet can't be directly controlled.
To set the capture height use the -H (--height) option followed by the height in pixels or a percentage (with a percentage, height will be computed from the source height).
To set the aspect ratio use the -a (--aspect) option followed by the aspect ratio either as a (floating point) number or a fraction (both 1.33 and 4/3 are valid formats).
To force a certain width combine height and aspect ratio, e.g. if you want your captures to be 300×200 pixels you can use -H 200 -a 300/200 (in case it isn't obvious, an image 200px high and having a 300/200 –same as 3/2, 1.5– aspect ratio must be 300×200 pixels).
Use -A (--autoaspect) to let vcs try to guess aspect ratio. Guesses are only made on well known resolutions (i.e. VCD and DVD family of resolutions), note that for cases in which both a 4:3 and a 16:9 resolution are possible 4:3 is chosen. If it can't be guessed the original aspect ratio will be used.
Output filename
vcs 1.11 and higher only
The output filename can be set with the -o (–output) option. Repeat for each input filename.
Additionally the file extension of the output filename can also control the file format.
Examples
Save to output.jpg:
$ vcs input.avi -o output.jpg
Save output of file1.avi to output1.jpg, output of file2.avi to output2.png and output of file3.avi to file3.avi.png:
$ vcs file1.avi file2.avi file3.avi -o output1.jpg -o output2
Adding a title
A title like can be added through the -T (--title) option. The title will be displayed in a big font below the meta-information heading.
Example
Changing colourscheme
See Setting Contact Sheet Colours for details.
